Geocoding & APIs
The ability to accurately and quickly determine the geographic location of an address is a powerful process. With the location of an address, you open a world of possible analyses that were previously unattainable. With a location, you can determine how close your address is to another point, calculate a network route to that point, and see what else is nearby. This action of estimating and retrieving geographic information for an address is called geocoding.
GEOCODING
Geocoding is not a new technology. The process to determine the most likely geographic point for an address has existed with many GIS’s for years, allowing users to take large lists of addresses and accurately assign them latitude and longitude coordinates for usage in a map.
With the introduction web maps and user supplied addresses, geocoding had to work as a web tool as well and no longer could no longer rely on stand-alone desktop software. This required the browser to be able send a query of an address to a geocoder and have that return information back to the webpage with the likeliest locations for the supplied input. To do this effectively, webmaps needed access to a geocoder via an API.
What is an API?
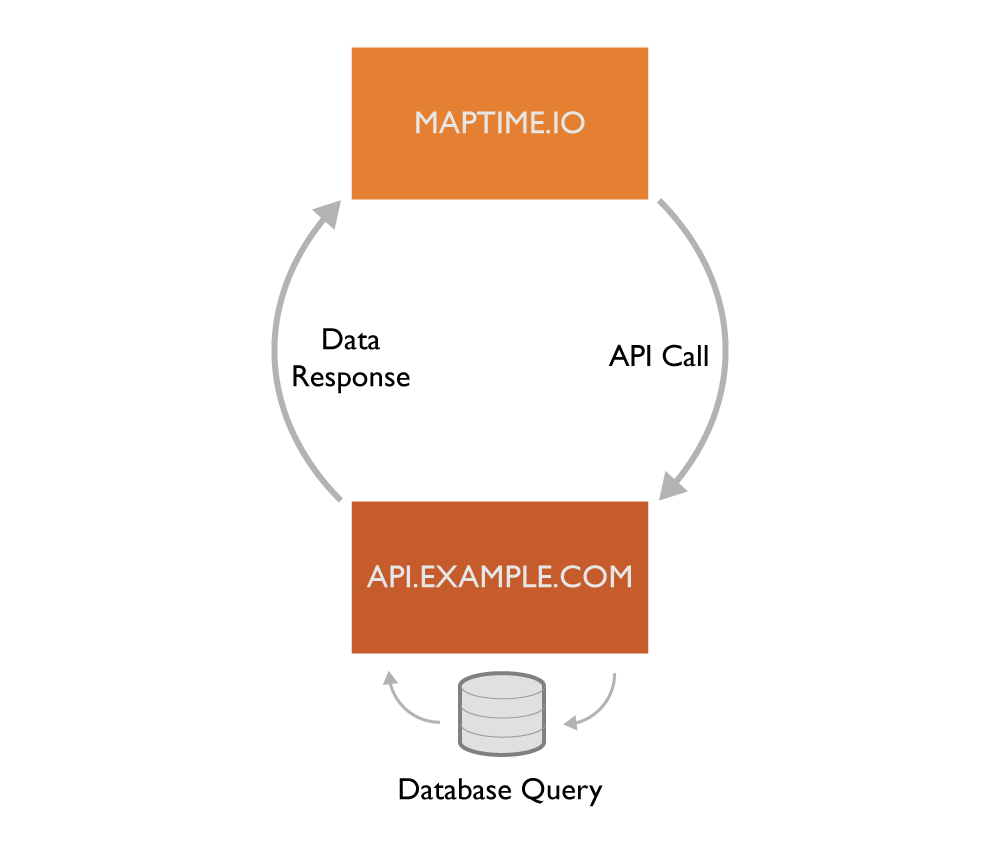
API: Application Programming Interface. Those three words are pretty confusing. Worry not! APIs serve a very basic purpose: accept a query and return data that matches the query. If you have ever used the internet, you have a lot of experience with APIs, in fact, you are an expert. APIs and their queries are generally accessible via URLs at a website. For example, you can send a query to api.example.com by passing specific parameters in the URL:
http://api.example.com?query=hello&format=json
Let’s break down the above URL.
- api.example.com - First, you see that
api.example.comis where this website’s API exists. This is usually because the database that your are attempting to gather data from will be accessible from it’s own unique URL (typically not the primary domain for a website). - ? - What? Why is there a question mark? This is the required syntax for passing parameters through a URL. Where the
?exists, parameters follow. Note: this is not only for APIs, but for the case of this tutorial, let’s say it is. - query=hello - This is the first parameter called
querythat accepts any string, in this casehello, to test against the database. The results from this query should return anything that is relevant to the word hello. - & - The ampersand symbolizes a new parameter in the URL.
- format=json - This parameter specifies an output format for the data returned from the API. Available output formats are usually determined by the API, but you’ll frequently see
jsonsince this is a readable format used in Javascript.
Census Geocoding API
You may be thinking, “Where does a geocoder get geographic information?”. That’s a great question. A geocoder requires its own huge database of addresses and their respective locations. The Geocoder we’ll use in this tutorial is the Census Bureau’s free geocoding API, which accesses the Census address repository. Other geocoders access their own address repositories; Google uses proprietary data and Mapbox uses OSM address data.
Like the example.com URL above, the Census has their own URL to access their geocoder. Below is an example with the required parameters, which we’ll discuss in depth. Go ahead and click the URL to see what the response is.
- http://geocoding.geo.census.gov/geocoder/locations/onelineaddress - this is the URL endpoint where we send information. The
onelineaddressis a special endpoint that allows us to send a single string address through the geocoder without breaking the data into distinct parts (i.e. street number, street name, city, state, etc.). - ?address=1225+Prestwick+Terrace+Mahtomedi+MN - this is the address query we send to the geocoding API.
- benchmark=4 - the benchmark parameter is the address dataset you’d like to access. Number
4is ID for the most recent dataset from the Census. - format=jsonp -
jsonpis the data type that we’d like to have returned for this address. Because we retrieve results from a URL different from our own, thejsonpdata type allows us to bypass Cross Origin Issues.
Take a look at the Census page with more information about the their geocoder’s optional parameters that allow you to tune your requests.
With the above URL concept, we’ll look at how to build a web page that transforms a query into a URL that returns geographic information to put on our map.
Build a Geocoder
To get started, grab an HTML boilerplate from some of our other meetings and save it to a .html file. To view that page in your browser, find the file on your computer and right click it to “open with” whichever browser you prefer.
Making a call to an API
To make a call to an API, we will use a special function to make an HTTP request. In our case, we’re going to use the $.ajax() function from the jQuery library, which allows us to form a call quite easily.
Note: There are many javascript libraries that include HTTP request functions and do it quite well. You can also do this in regular javascript, but for the sake of this tutorial the jQuery implementation makes this process much easier.
Access the jQuery library in your webpage by adding the following within the <head> of your file:
<script src="http://code.jquery.com/jquery-1.11.2.min.js"></script>
Between your <script></script> tags that are within the ‘<body>’ of your file, add the $.ajax() function:
$.ajax({
    url: 'YOUR URL',
    dataType: 'jsonp',
    success: function(response) {
        console.log(response);
    },
    error: function(error) {
        console.log(error);
    }
});
Before you reload your page, update YOUR URL with the example from above. Notice that the dataType is set to jsonp to avoid nasty cross origin issues.
The final two options are success and error. A successful response will return the callback variable response, which we then print to the console. If the response errors out, an error message is returned and we print that instead.
What’s a console? Good question! Your browser (Chrome, Safari, Firefox) has a “console” that allows you to print information via javascript (among other things) so we can test our work. Open up your developer console (hit F12 then select console), then load the page you just built or the example below. See the response from the Census geocoder?
Our example runs the $.ajax() function directly when the page loads. You’ll notice a brief delay before something happens. Your browser is waiting for a response from the Census, just like your grandparents anticipate your next letter. Once your browser receives the response, it will spit it out to your console so you can see the data. You will see something like this when you expand the fields:
Input field for an address
Okay, the above is neat. But do we want a website that geocodes the same address every time? NO WAY! Let’s build in the functionality for the user to input an address, then make the call to the Census API.
This requires an <input> element in our HTML. Two of them, to be precise. One for the actual text input of an address, the other as a submit button. Below is the code you should add after your <body> tag:
<input type="text" id="address">
<input type="submit" value="GEOCODE!" onclick="geocode();">
Notice that geocode() function above? You might be wondering where that comes from… Well, we need to add it to our javascript below as a wrapper around the &.ajax() function. This will be executed only when the user clicks the GEOCODE! button. In order to grab the value from the text field, we’ll have to access that element’s ID using document.getElementById('address') and pass it through our url parameter. Let’s replace the value of the address variable with this new function instead. Here’s the javascript wrapper:
function geocode() {
    var address = document.getElementById('address').value;
    $.ajax({
        // ...
    });
}
Below is the full example that you can copy and run in your browser. Again, the response will show in your console once you enter an address and press the Geocode button.
Retrieve latitude & longitude values
Now that we have a cool little web application, let’s turn our attention to the most important part… the data! In the GIF above, you may have noticed that the response from the Census geocoder includes the all-important coordinates information. To access this info in our app, we’ll have to use Javascript’s dot notation. The response object is like a lake of data, branching into new rivers and streams. Let’s break down how to dive in by looking at the three key pieces:
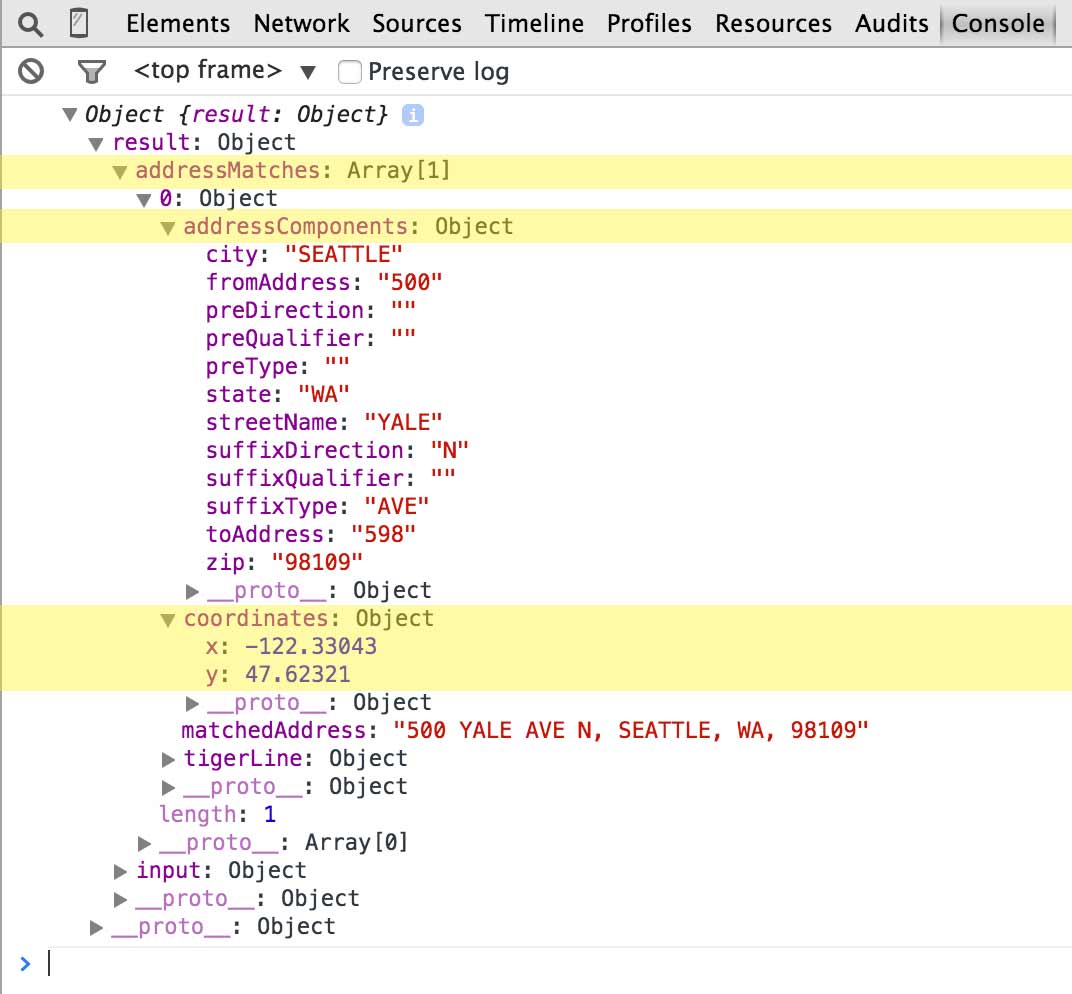
addressMatches: The geocoder will return a response based on the most accurate address information it can find. This doesn’t mean that there is only one result for a search, though. If you aren’t specific enough in your search (i.e. 1235 Maple Dr.) the geocoder will respond with an array of the most likely results. The first (0) result is the likeliest of possibilities, which is what we’ll use in our application.addressComponents: This is the proper breakdown of the address parameter. You’ll see there is a space for each potential value in an address, such ascityorstreetName. This object is included within theaddressMatchesobject.coordinates: Finally! Longitude(x) and latitude(y) (x&y) coordinates. This object is also located within theaddressMatchesobject.
In order to access the coordinates we’ll have to canoe our way down the object stream starting with the response variable we defined in our success function. Remember, we’re grabbing the FIRST address returned, which is the 0th object in the addressMatches array.
var latitude = response.result.addressMatches[0].coordinates.y;
var longitude = response.result.addressMatches[0].coordinates.x;
Here’s the working example that prints the latitude and longitude to the console in your browser:
What’s next?
Now that we have latitude and longitude defined in variables, we can pass that information to anything we want, such as the Leaflet mapping library! Here’s a project that takes the above work and creates a new point marker on the map. Feel free to contribute to the project on github!